How I built a blog with Svelte and SvelteKit

by Matt Fantinel
08 Sep 2021 - 14 min read
Updated 21 May 2023
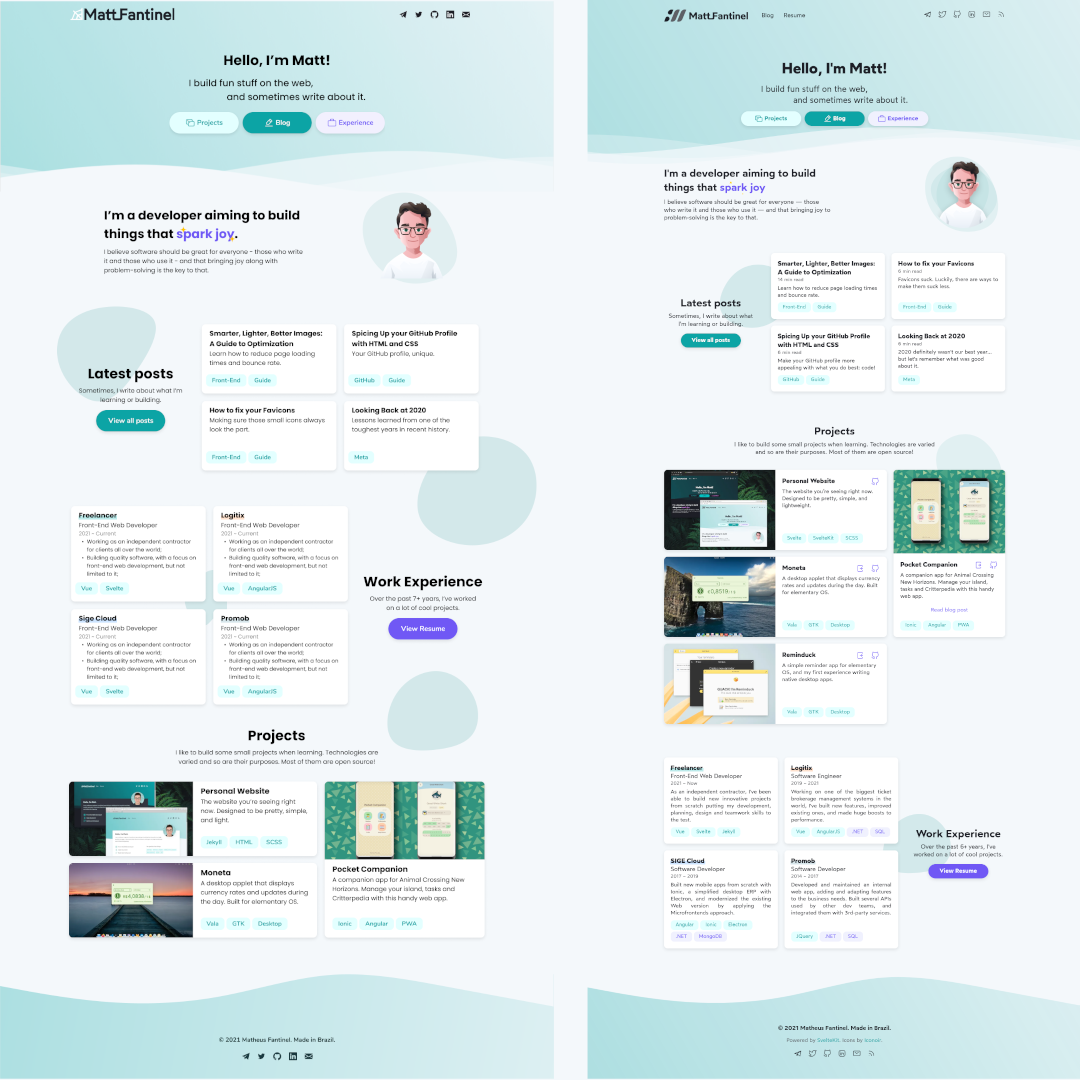
I've recently re-launched my personal website and blog, that's now reached its 3rd version. There was nothing wrong with the previous one, but I wanted to both give it a small visual refresh and learn something new. So, after a month or so of working on it on my free time,
While the code for this website is open-source, it has a lot of content that's very specific to myself. So, if you want to use it as a template to get your own website started, I've created a public template that you can use as a starting point!
About Svelte and SvelteKit
Svelte is a new cool kid on the JS block - it was launched in 2016, but it really started getting traction when its 3.0 version was launched in 2019. It is a competitor to the big JS frameworks - React, Vue, Angular - but, instead of simply being an alternative way of doing things, it differentiates itself on a fundamental level:
This means that it does its job at build time, not at runtime. While other frameworks (React, for example) need JavaScript code that runs on the client in order for your components to work properly, Svelte does not, because it interprets your code on build time, and only ships exactly what it needs to run. This means websites made with Svelte can be much smaller in size and faster because it has less code to run.
SvelteKit is a framework built on top of that. It is an opinionated set of rules that helps you get a Svelte app built pretty quickly. You can compare it to NextJS (for React) or Nuxt (for Vue). It has great defaults and encourages good practices, like server-side rendering, for example. At the time of building this website, SvelteKit was still in Beta. However, progress is steady and its API seems to be already stable, so it's unlikely there will be any breaking changes before 1.0 arrives.
Using both of the above allowed my website to have two important characteristics:
- Every single page is rendered at build time (server-side rendering). This means that as long as the HTML and CSS files are downloaded, it will look as it was meant to be;
- JavaScript is not needed. Try disabling JavaScript on your browser. You'll still be able to read this blog post and everything will look the same.
Progressive Enhancement
One of the concepts that really caught my eye with Svelte is the idea of Progressive Enhancement: making sure your app runs for everyone, and making it progressively more featureful if the user's device supports it . My website is a pretty simple project, but still there are instances of this:
If there's no JavaScript, the website uses the browser's native navigation API. Which means you can navigate between pages normally without any client-side code. However, if JavaScript is available, a client-side router will be used to make the transition between pages smoother and faster. This means that even if the user's device doesn't support JS for any reason, the site will still be completely functional.
We tend to think of JavaScript being disabled as a user choice, but that is usually not the case. Think of someone using their phone on a weak 3G connection that fails to load the .js files, or someone in the subway that lost signal while loading the page. It happens often and being able to show your content even in these conditions is a great way of not losing a visitor.
And you know what I had to do to support this? Nothing. Just using <a> elements is enough, as SvelteKit will intercept those if needed (JS enabled), or simply leave it to the browser otherwise.
Design
I'm not a designer, but I like to pretend I am. So, instead of designing-as-I-go when developing the website, I decided to fully design it on Figma before starting development. I figured that using it to design stuff is the best way to learn the platform, and I really finished this design much better at Figma than I was before. Auto-layout is fantastic since it works so much like CSS Flexbox, so I was able to approach it with a similar thought-process as I have when developing stuff.
The design itself was something I came up with, and it's an amalgamation of ideas and inspirations that were stored in my head. When building it, I wasn't entirely sure where the inspiration came from, but now it is apparent to me that most of it comes from some websites I love: Josh Comeau's and George Francis'.
After the design was complete, I finally began developing it. Since there are some things that you can only find out while developing it and giving it more attention, I made some small tweaks to the design while implementing it. Still, the final result was really similar to the initial design. I count that as a success!
Routing
Initially, SvelteKit used a file-based routing, as opposed to the current folder-based routing. This article has been updated to reflect those changes. If you were familiar with the previous system, this comment by the SvelteKit team might help you understand the changes.
SvelteKit uses a folder-based routing system. This means that your routes are dictated by the folder structure inside routes in your project. Every route must have a folder, except for the root ('/').
Inside each folder, you can add files that build up your page. Typically, in other frameworks, you would have a index.{html/js/jsx} file where everything the page needed would be loaded from. In SvelteKit, you can have multiple files, each representing a different part of the page.
The only required file is +page.svelte. This is where you can add your markup, components, styles and logic. However, it's likely that your page might need to load some data to be displayed. This can be done on another file, +page.js, in the same folder. There, you can add a load function where you'll have access to query params and other things and be able to load all the data your page needs.
The cool thing about that is that SvelteKit will use the content of the +page.js file both server-side and client-side, depending on the situation. However, if the data you need can only be loaded on the server (like for example querying a database or using a secret key), you can name it +page.server.js instead. Both would do the same thing, however the naming difference makes it much easier on a quick glance to identify what runs where.
So, an example of what the basic file structure for my website would look like:
				└── routes
    ├── +layout.svelte
    ├── +page.svelte # / (root page)
    ├── resume
        └── +page.svelte # /resume
    ├── blog
        ├── +page.svelte # /blog
        └── +page.js # Loads data to show on /blog
    ├── blog-post-name
        └── +page.md # Blog post content (Markdown file)
Having multiple files in a folder might look a bit cumbersome at first, but it makes their purpose much clearer. The great reasoning behind this pattern is that it gives you a single way of doing routing instead of multiple, which makes things more standardized and easier to understand later on. Remember, SvelteKit is opinionated on purpose, and I think folder-based routing is more readable and I'd say more flexible than other file-based routing solutions, although it is a bit more verbose.
The +layout.svelte file is a base layout for all the pages inside the route. Which means that I can have shared code for all pages in there. See the example below, where I added the header and footer components to the layout, and load the content of the route itself in the <slot> element:
			<Header />

<main>
    <slot />
</main>

<Footer />
Layout Groups
Having a +layout.svelte file is a great way to avoid re-writing the same base layout multiple times. However, sometimes you might want to have a different layout for a group of pages. For example, I wanted the blog posts to have some extra elements that the rest of the pages didn't have, like a title and related posts at the bottom.
For that, I used a layout group, defining that the post page shouldn't use the main layout, but instead have its own.
To create a layout group, I've created a folder inside of routes with the name of the new layout blog-article, wrapped in parentheses to indicate it uses its own layout. The routes directory ended up like this:
				└── routes
    ├── +layout.svelte
    ├── +page.svelte # / (root page)
    ├── resume
        └── +page.svelte # /resume
    ├── blog
        ├── +page.svelte # /blog
        └── +page.js # Loads data to show on /blog
    ├── (blog-article)
        ├── +layout.svelte # This layout applies only to this folder
        ├── +layout.js # Loads data to show on the layout file
        ├── [slug]
            ├── +page.md # Blog post content (Markdown file)
Keep in mind that, just like pages, layout files can also have their data-loading counterparts: +layout.js and +layout.server.js.
The blog
The main challenge for me was in processing Markdown (.md) files of the blog posts into actual Svelte code. Unlike Jekyll, which I was using previously for this blog, SvelteKit doesn't have anything built-in for this (yet) and online resources are a bit scarce (which is normal, since it's still in beta).
I had three requisites for this:
- I wanted to write blog posts in Markdown, because of its ease, and also so I wouldn't have to rewrite all the existing posts;
- I wanted to be able to use Svelte components inside the blog posts as well, for more interactive elements;
- It has to be rendered on build time so the blog can be deployed as a static site;
I had heard about something similar to what I wanted, called MDX. It allows everything I wanted, however, it was React-based and I couldn't use it. Luckily, I found out about MDsveX, a project with the same goal as MDX, but for Svelte!
After setting it up, having the Markdown content rendered was very straightforward. However, I need to use some of the post's data to load stuff into the +layout.svelte file, like the title, image, date and related posts. Plus, I wanted to be able to get a list of all blog posts and be able to filter them, to show on the "Recent Posts" cards on the home page, as well as the blog page itself.
Extracting post data
I found out when searching that we can import all the .md files as modules, and process them via JS, since this code will run on the server. I ended up creating a posts.js file to centralize this logic, and did the following:
			// Import the markdown files for each post
const imports = import.meta.globEager('./posts/*.md');

const posts = [];
for (const path in imports) {
    const post = imports[path];
    if (post) {
        // For each of them, MDsveX will do the heavy lifting. The "metadata"
        // is automatically recovered from the Frontmatter
        posts.push({
            ...post.metadata
        });
    }
}

// Filter the post and order them by published date
const filteredPosts = posts
    .filter((post) => !post.hidden)
    .sort((a, b) =>
        new Date(a.date).getTime() > new Date(b.date).getTime()
            ? -1
            : new Date(a.date).getTime() < new Date(b.date).getTime()
            ? 1
            : 0
    );

// Expose this info to other files
export default filteredPosts;
With that data being exported from that file, I can reuse it in the places I need:
Blog post page
On the routes/(blog-article)/+layout.js file, I can now import the posts and look for the one I should display (by comparing slugs). After that, I'll pass the data I need back to the +layout.svelte file.
On the routes/[slug]/+page.svelte file, I can now import the posts and look for the one I should display (by comparing slugs). After that, I'll get its module and use the special <svelte:component> (see docs) tag to use it inside the page.
			import { filteredPosts } from '$lib/data/posts';

export async function load({ url }: { url: { pathname: string } }) {
    const { pathname } = url;
    const slug = pathname.replace('/', '');
    const post = filteredPosts.find((post) => post.slug === slug);

    return {
        post
    };
}
			<script>
    // Declare the data variable that comes from the server
    // And extract its post property
    export let data;
    $: ({ post } = data);
</script>

<!-- Here we can use the post data we need -->
<h1>{post.title}</h1>
Listing all posts
Now the post page is done, we need a way to display all the posts on the main blog page. We already have them sorted and filtered in the posts.js file, so all I have to do is fetch that data and iterate on it to display them all.
Since the posts data comes from the server, it needs to run there. I'll use a blog/+page.server.js file to fetch that data and send it to the client-side page.
			import { error } from '@sveltejs/kit';
import posts from '$lib/posts';

export async function load() {
    const result = Object.keys(posts).map((index) => {
        const { slug, title, date, excerpt, tags, readingTime } = posts[index];
        return {
            slug,
            title,
            date,
            excerpt,
            tags,
            readingTime
        };
    });

    if (result) {
        return {
            posts: result
        };
    }

    throw error(500, `Could not load blog posts`);
}
And, on the page itself:
			<script>
    export let data;
    let { posts } = data;
</script>

{#each posts as post}
    <BlogPostCard {post} />
{/each}
RSS
Something that SvelteKit currently does not provide a solution for is a RSS feed. Previously, mine was built automatically by Jekyll and I never had to do anything to get it working. While this wasn't the case right now, I'm sure once SvelteKit is stable and mature, solutions for this will be available so no manual work has to be done.
I made mine by taking advantage of SvelteKit's endpoints by creating a +server.js file, and serving a XML file that is generated at build time. I import the filtered posts from the posts.js file I created earlier, and use the metadata to build the content of the RSS file. You can check out the source code for implementation details.
Sitemap
Another thing that's still not built-in to SvelteKit is the sitemap. It's great for SEO, especially for newer websites, so I researched a good way of adding one. Luckily, someone already built a tool to generate them automatically, and there is already a discussion to build it into SvelteKit directly. Check out svelte-sitemap for generating your own.
Wrapping Up
My first experience with Svelte and SvelteKit was, overall, fantastic. It simplifies many parts of development and having server-side-rendering as a default option really drives forward their purpose of simplifying web both for users and developers.
Though I definitely did not use all of Svelte's strengths on this project, since it doesn't need dynamic data and an application state, I'll be working with that soon enough. Its ecosystem is not as big as its competitors', since Svelte is still small compared to them, but they're doing something right with their new approach, as Svelte is the most loved web framework according to 2021's StackOverflow survey. Not to mention that Svelte itself doesn't try to reinvent the wheel, and therefore is compatible with almost everything JavaScript.
The small issues I've had while building this will definitely be gone soon, as they were caused by SvelteKit not being on a stable version yet. I'm excited to see how much the ecosystem grows the next year; I'll definitely be keeping an eye on it!
Don't forget all the code for this website and blog are open source, feel free to use it and to propose changes if you'd like!
Thanks for reading!
See the starting template